Photo of the Month Contest
The photo of the month contest provides you with the opportunity to allow you to compare your work with that of others, as you perhaps think about entering our outside exhibits. It’s good training, and by compelling you to focus on specific themes you learn and grow in your photography. A Board member will be at the display to answer questions and encourage participation.
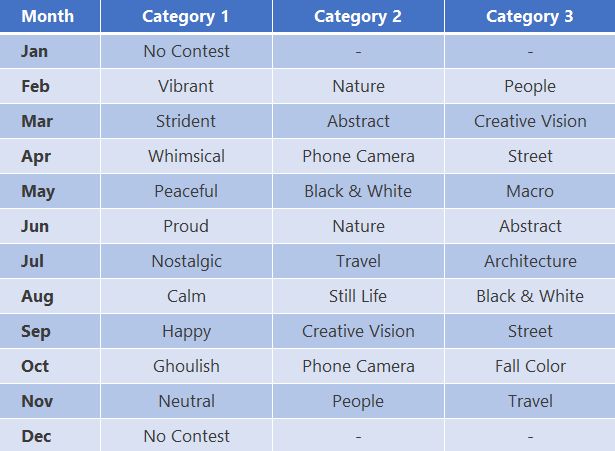
2019 Photo of the Month Themes
Previous Photo of the Month Winners: 2018

A Blurb book of all winning images will be offered for sale in December.
Rules and Information
- You must be a member in good standing to enter.
- Each image must have been made in the prior 12 months, printed in a maximum 8.5″ x 11″ size, and identified on the reverse side with your name. A provided self-adhesive number is to be affixed to a front corner, as the voting will be by number and not by the name of the photographer.
- There will be 3 categories each month and you may enter one photograph in your choice of 2 of the 3. Voting will determine a first and second place in each category.
- There will be a total of 6 winners each month, announced at the close of the meeting. Winners must follow the instructions below for emailing their image(s) for sharing on various media.
Instructions for Photo of the Month Winners
Resizing and Submitting Images
- Resize your image to 2000 pixels along the longest edge (see details below)
- Down-sample your image so it less then 1MB
- Save image as a .jpg format
- Use the Submission Form below to upload your image and include the requested information
Photoshop Instructions:
Note – These instructions are for slightly older versions of Photoshop and, as they say, there’s a million different ways to skin a cat, but they should work for most people. Please feel free to email our Webmaster if you need help
- Open your image in Photoshop and navigate to Image>Image Size
- Make sure that Constrain Proportions (PS2019 uses a padlock) and Resample Image fields are checked.
- Enter 200 into the Resolution field (Pixels/Inch)
- Enter 10 (inches) in either Height or Width field depending which dimension of your image is larger. The other dimension will automatically fill in.
- Click OK
- Your image is now sized at 2000 pixels along the longest edge.
- File > Save As, and provide a name such that you do not overwrite your original.
- Please take note of the size of the file that is produced – it needs to be less than 1MB, but closer to 500K is better.
Lightroom Instructions:
- Select your image while in Library Mode. Select Export (lower left corner).
- Export Location – Choose a location
- File Naming – Check Rename To and select Custom Name. Enter your First_Last Name into Custom Text.
- File Settings – Select these settings: Image Format – JPEG, Quality – 75, Color Space – sRGB, Limit File Size To: 500K
- Image Sizing – Check Resize to Fit and select Long Edge. Type 2000 in the box below and select “pixels”. Resolution is irrelevant.
- Output Sharpening – Tick Sharpen For and select Screen. Select Standard for Amount
- Metadata – Select Copyright and Contact Info Only
- Select Export (lower right corner)
All fields must be answered. If you won two categories, please use the form twice and submit each image with the associated description.